Friday, February 26, 2010

Studio Tour Part 1: The Workbench

Welcome to the Layne Designs virtual studio tour. Each week for the next several weeks, I will be photographing different areas of my studio and sharing what is done there, and how. I am also including tips for setting up your own workspace for jewelry students and hobbyists. There may be a golden idea for craftspeople of all kinds about how to set up a space efficiently. I am sharing this because I have found it extremely enriching to visit studio spaces of other artists, and hopefully this will be helpful for some of my readers. Please leave comments and questions that I can respond to during the tour!


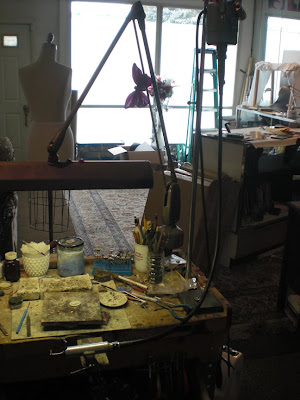
It seems appropriate to start the studio tour in the place where I spend most of my time. Right here looking at this workbench. It is a double wide workbench, made for two people to sit side by side, but I have arranged to use the whole space for my efficiency. On the left I keep a crockpot of acid called "pickle" for cleaning the metal after soldering operations. The acid is then neutralized by a bath of baking soda water before work continues.
In the center is a Hoke brand oxy/propane fueled torch on a home-made hanger-- it is a good idea to have a place to hang your torch so that it does not have to be turned off every time you need to use both of your hands. Be certain that the hanger is tall enough and far enough away from any objects that could catch fire

The following image is of the main part of my workbench. It is arranged so that while working, as many tools as possible are within an arm's reach.

A: a measuring tape for sewing can be stapled across the front edge of your catch tray for quick measurements, and you always know where it is! (unlike some of my other rulers)
B: sharpstone- I keep a sharpstone on hand for shaping rubber wheels to fit in tight places and to keep gravers sharp
C: plate for spare parts- a small container (or tea saucer) It is helpful to keep track of your scraps so that nothing goes to waste. I to sweep most scraps to the upper right hand corner of the catch- tray, but the small parts like an extra jump ring or spare ear-wire are kept in the plate waiting to be used
D: bur collection-it takes a while to build a good variety-- I started with a small assorted shapes set, but found that most often, I needed a very particular size of each shape, so I have bought a set of graduated sizes in each of the following shapes: cylinder, setting, hart, bud, round, cup.
E: super glue aka cyanoacrylate I keep some of this handy for sealing bad cuts-- not necessarily medically advised, but on a clean cut, it stops the bleeding immediately and allows me to keep working after taping up the injury.
F: white out- works like yellow ochre to protect a solder seam from re-flowing while heating another part of the piece. The fumes are not good to breathe in...use only with proper ventilation and/or a respirator.
G: gluestick: use a gluestick or rubber cement to adhere a drawing to a sheet of metal for accuracy while sawing.
H: flux-to keep your large container of flux from getting dirty, transfer a small amount into a smaller container for on the workbench. It takes up less space too.
I: water jar for quenching hot metal
J: rubber wheels/sanding discs/brushes for flex shaft machine
K: pencils, sharpies and tinsnips
L:needle files and scribe
M: this is an assortment of fingertip protectors. They are made from leather and masking tape, and protect the finger most likely to be injured during a specific task.
N: steel bench block.
O:tweezers and solder picks,
P: Firebrick: a few different sizes and types of solder bricks help for proper set-up of the item to be soldered.
Q: put down a spare linoleum tile to avoid burning your bench if the heat makes it the whole way through the fire brick
R: Benchpin- you can use coarse files to alter your benchpin.. It may be helpful to file a notch in one end for working with tiny parts, or drill a hole the whole way through to work on the front of earrings with posts (good luck remembering which hole goes the whole way through!)

Another method for keeping more of your tools right by your side while working is to make home-made attachments and hangers. A nail driven halfway into the side of your bench is perfect for hanging your sawframe, and a home-made or even store bought drawer pull placed low on the bench drawer will hang all of your pliers nicely in a row. Part of the convenience of these specialty hangers is that it helps you keep track of your tools. You'll spend less time looking for that one pair of pliers if you know that they are always in the same place.

Thursday, February 18, 2010

Mini-Lathe


One of the biggest problems facing bench jewelers and many folks who work with their hands is hand fatigue. RSS or repetitive stress syndrome is a more serious problem that happens as a result of regular constant work that puts stresses one particular part of the body. At my workbench I am constantly inventing tools or ways to use my tools that reduce stress on my hands.


The flexible shaft machine is a common tool among different types of craftspeople, and an outright necessity to a jeweler. For the unfamiliar: it is a handheld rotary tool like a drill with a long flexible cord that attaches to a hanging motor. It is similar to a Dremmel tool, (what they use in nail salons to buff acrylic nails) but more powerful.

The reason that a felx shaft machine is preferred to a handheld drill is because of its compact, lightweight hand-piece. It can be used comfortably for hours. Yet hours each day for weeks on end, that hand-piece can start to feel like a lead weight. So I have devised a clever solution. It is not appropriate for all jobs, but it works great for some.

I present: the mini-lathe. I found a miniature vice at an antique shop years ago, and had to have it because it was so very cute. It had no purpose at the time, but followed me for years, and finally a few weeks ago it found it's golden purpose in life: to hold the handpiece of my flex shaft machine sideways so that it can be used as a miniature lathe! Oh for joy! It is seen below used with a abrasive-impregnated rubber cylander for sanding and polishing small parts-- especially the ends of earring posts.


It is a huge relief on my hands to be able to let this perfect tiny vice hold the machine for me while I do tedious time consuming jobs. If you plan on trying something like this there are a few things to note:

-Be sure not to crush the hand-piece of the machine with the vice...and it's probably a good idea to try this only on your own equipment> if you are going to be an inventor, you have to invest in your own tools because you can't take a risk on public or community studio equipment.

-Always take the proper safety precautions especially when working with rotary equipment: wear safety glasses and be sure not to have loose hair or accessories that could get caught in the machine

-You have less control over the machine when it is held this way-- pay special attention to the angle that you are holding the metal

-Rubber wheels can cut through the metal very quickly, it is not advised to use them on flat surface, as this could create divets or ripples-- use sandpaper the old fashioned way for flat surfaces

--Be sure that the vice is secured well-- if securing it to your benchpin as I have done, be sure also that the benchpin is secure!

--Be careful if using pliers to tighten wingnuts especially on old equipment, it is possible to over-tighten and break the wing off the threaded portion (this is extremely difficult to fix)

Thursday, February 11, 2010

Healing Gem Stones and Chakras

There are many mystical and diverse beliefs in cultures all over the world about gemstones. While some of these beliefs may be simple myths, it sure does awaken the fantastic whimsy in all of us to think that a stone holds special power. While some of the folklore is complex and difficult to remember, the Chakra system and related healing stones are simple and easy to remember.

Each of seven chakras in the body are considered to be like a vortex of energy or an aura of color. Auras are a common idea throughout many cultures including Christianity where images of Christ are always represented in medieval times with a halo. The Chakras are from Hindu and Buddhist beliefs. In the Chakra system, each aura center is associated with a different area of the body, certain organs, and even certain emotions. The associations can be very specific, but looking at this chart, it is simple to draw some conclusions. The rainbow colors are easy to remember. They begin at the very base of the spine and groin area with the red root chakra. This chakra is associated with primal survival needs, it represents foundation, groundedness, and animal nature among other things.
A more extensive knowledge of the influence of each chakra requires a great deal of study. The simple part is that each chakra is thought to be healed, balanced or energized by gemstones of a corresponding color. Therefore, all red stones: ruby, garnet, red jasper, bloodstone, rose quartz, coral etc,... are used with the red chakra.

A quick list of Chakras, general associations, and gemstone associations:

Crown Chakra: color-violet, located above the head, represents a persons conectivity with the universe, Gemstones: Amethyst

Brow Chakra: color-indigo, ocated between the eyes, effects the eyes, nose and ears, Gemstones: azurite, lapis lazuli

Throat Chakra: color-blue, located at the throat, effects thyroid, voice, and breathing, Gemstones: sapphire, blue topaz, aquamarine, turquoise, chrysocolla and sodalite.

Heart Chakra: color-green, located at the center of the breastbone, effects heart and circulatory system, relationships, Gemstones: Emerald, aventurine, jade, chrysoprase, toumaline, malachite, peridot

Solar Plexus Chakra: color-yellow, located between the naval and bottom of the ribcage, effects the pancreas, liver, gall bladder, digestive system, and sense of identity, Gemstones: topaz, citrine, amber

Sacral Hara Chakra: color-orange, located in the reproductive organs, effects reproductive system and sexuality, Gemstone: carnelian, fire opal

Rooth Chakra: color-red, located at the base of the spine, effects kidneys and equilibrium, Gemstones: ruby, garnet, red jasper, bloodstone, rose quartz, coral

So how does one use these stones for their benefit? Just relax and hold a turquoise over your throat if you have lost your voice, or maybe wear a jade necklace if you have a relationship problem. This is by no means medical advice, but it is ancient belief, and you never know what might happen. Of course you should consult a doctor for any serious medical problems.

Monday, February 8, 2010

Natural surface gems


Possibly the best part of my job is shopping for gemstones. Who wouldn't love shuffling through piles of beautiful sparkling gems looking for the ones that speak to you as a designer? Then the anticipation as the gems are filed and stored and waiting to sit down with you and your sketchbook to be dreamt (is that a real word....maybe dreamed?) into stylish jewelry pieces.

Traditional gemstones are classically beautiful, and often carry a lot of meaning to the wearer. Some are birthstones, and are good luck for the wearer. Others are thought to heal or relieve certain ailments. The history of folklore behind gemstones goes as far back as the ancient Greek and Egyptian cultures. For instance, the Greeks believed that an amethyst in a persons goblet could stave off drunkenness. The really funny part about this piece of folklore is that an amethyst dropped in a goblet of water makes the water look like wine. I suspect that if a person's guests were drunk enough, they could save quite a lot of wine by trading off for this trick late in the evening. Especially considering that the Greeks were notorious for their long lasting feasts flowing with wine.


The gems pictured here might not remind you of any that you are familiar with, but many of them are related to gems that you know of. The long slice of crystals in the top image is actually amethyst in its naturally occurring form. The white and black stones are opal with fossils trapped inside! A lot of stones that you might not recognize have a very interesting story. I am fascinated with the story of their creation.

Most of what is pictured here is druzy. Druzy is a word referring to the stones that seem to have glitter across the top surface. The glitter is natural! These gems are created when water saturated with silicate is pressured into porous rock underground. If this water and rock are cooled rapidly, the silicate in the water fuses with the rock and sort of freezes into these tiny crystals! How cool is that?! Maybe it's the science geek in me, but I just love to learn about how these fancy rocks came to be.

Monday, February 1, 2010

NY International Gift Show and Spot On Designs


The New York International Gift Show is immense. It seems impossible to see every corner of the vast showroom floor. Vendors from all over the world are separated into categories like handmade, just for kids, house wares, wearables.....etc. Some areas are separated into the product's country of origin. I got lost in one section so large that I became panicked with the thought that I couldn't find my way out!

I was there to show my support and congratulate a very special person. Her name is Penny Rakov, owner of Spot On Designs. I found her booth tucked into the handmade section and she was smiling brightly. Penny worked so hard to get here. This show is for retailers to purchase items at wholesale to stock their gift shops, boutiques, museum stores, etc... and despite paying thousands for her 10 by 10 feet of glory and being shuffled into the mix of a few thousand vendors, Penny's show is a sucess. She has done wholesale shows in the past, but never a show with such a huge amount of traffic!

Penny makes beautiful glass murrini. The process for making the murrini is really fascinating. She creates patterns from bars of colored glass and then goes to a hot glass shop to heat up the patterns and stretch them out. Later, after annealing and cooling, the long bars are sliced to reveal the patterns. The results are incredible. Each of her patterns is like an original wonderland with intrinsic detail. She has a great eye for color, making some really exciting blends. One looks like candy, the next like a summer sky, another like a plant cell under a microscope.

Penny and I have been working together for a few years now. She hired me to set her murrini into artisan crafted jewelry pieces. The opportunity was very exciting for me, as I had just opened my own studio and needed to generate some regular income to keep it open. Our relationship has grown as has the product line. It started out as a few pendants, bezel set in sterling silver. Later we made some items in gold. Eventually we started working on stunning neckpieces involving up to nine murrinis scattered like a constellation around the neck.

Our latest project was my favorite: a line of cocktail rings that are real show-stoppers. I have really enjoyed using more of my skills to create a design for these rings that relates to the pattern in the "stone" (we call them stones when we talk with each other - even though they are glass) The under side of the setting is a dome of silver with a spattering of holes drilled to let in the light like a stained glass window. The rings are generally quite large, stones ranging from the size of a nickel to more than 2 inches in diameter! Quite a lot for a ring!

So way to go Penny, taking the world by storm and vending at a REALLY big show. Thanks for letting me be part of it, and way to be a happening entrepreneur. For more info on Spot On Designs check out the etsy store: www.spoton.etsy.com.